Getting Started
Install Basic Memory, configure it with your AI assistant, and create your first knowledge notes.
Basic Memory works through the Model Context Protocol (MCP) to connect with AI assistants like Claude Desktop, Claude Code, and Gemini CLI.
New to Basic Memory? Start with Cloud Setup for the fastest experience.
Prefer local-only or offline access? See Local Installation - the open-source version is free to install on your own machine.
Cloud Setup
Basic Memory Cloud provides hosted MCP access with no local installation required.
Why use Basic Memory Cloud?
- Access from any device
- Easily import your data
- 2-minute setup
- Local sync
- OAuth authentication
Sign Up
Create your account at app.basicmemory.com
Add Remote MCP Connector (Claude)
In Claude Desktop, go to Settings → Claude → Connectors
Click “Add connector” and enter:
- Name: Basic Memory
- Remote MCP server URL:
https://cloud.basicmemory.com/mcp
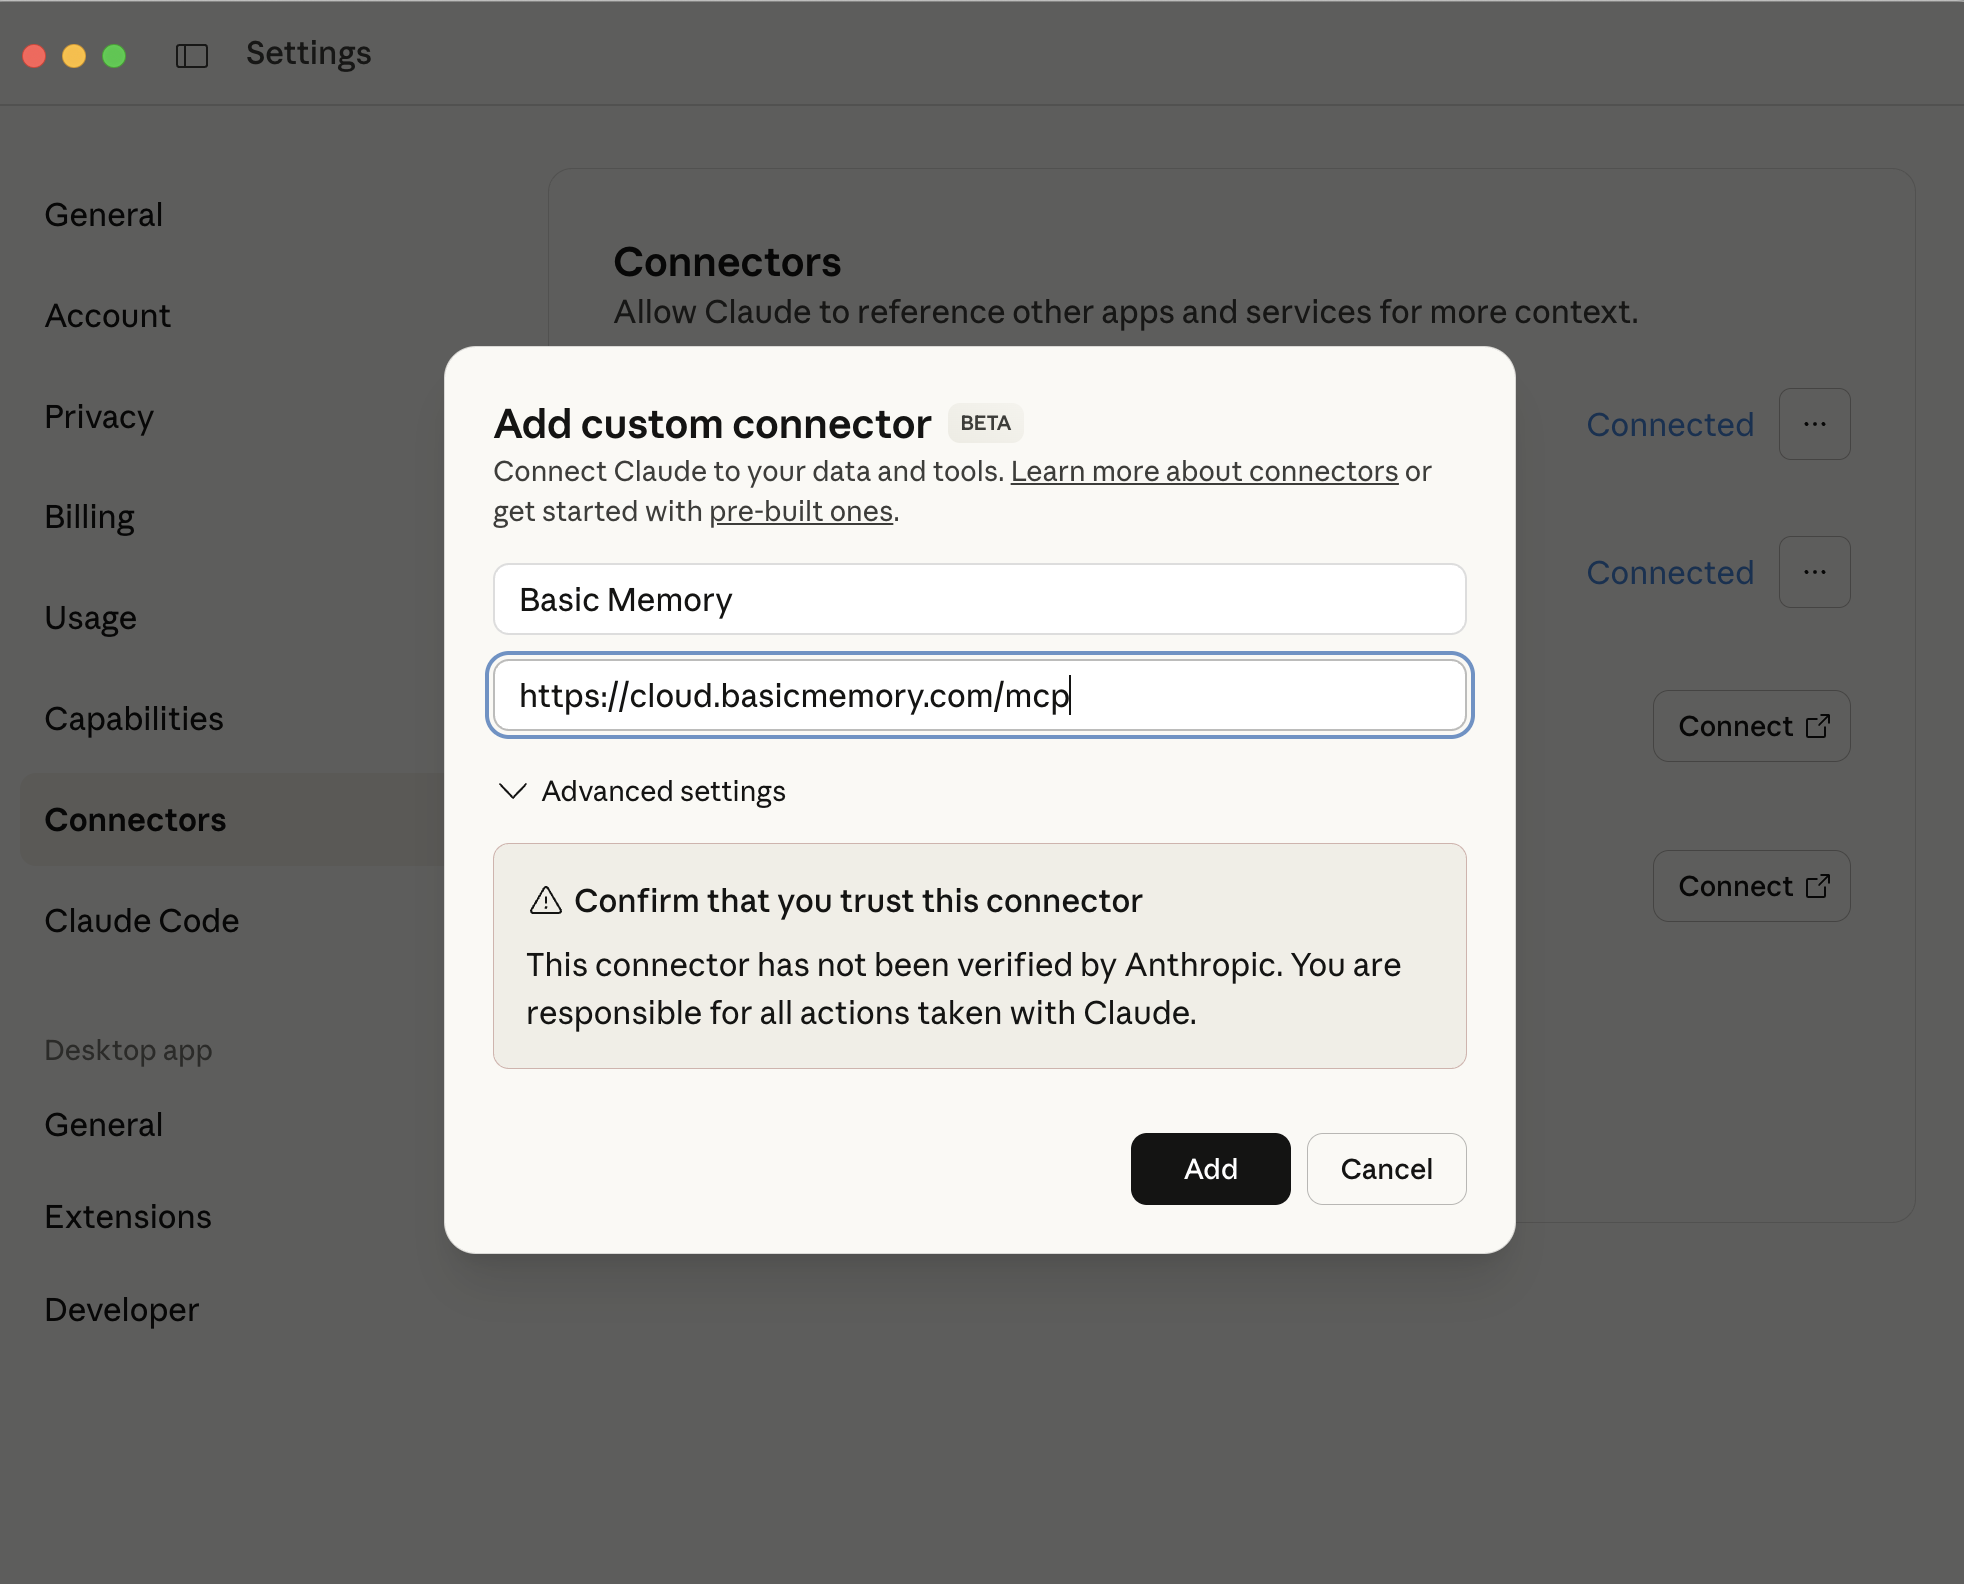
Authenticate
Click “Connect” and follow the OAuth flow to grant permissions
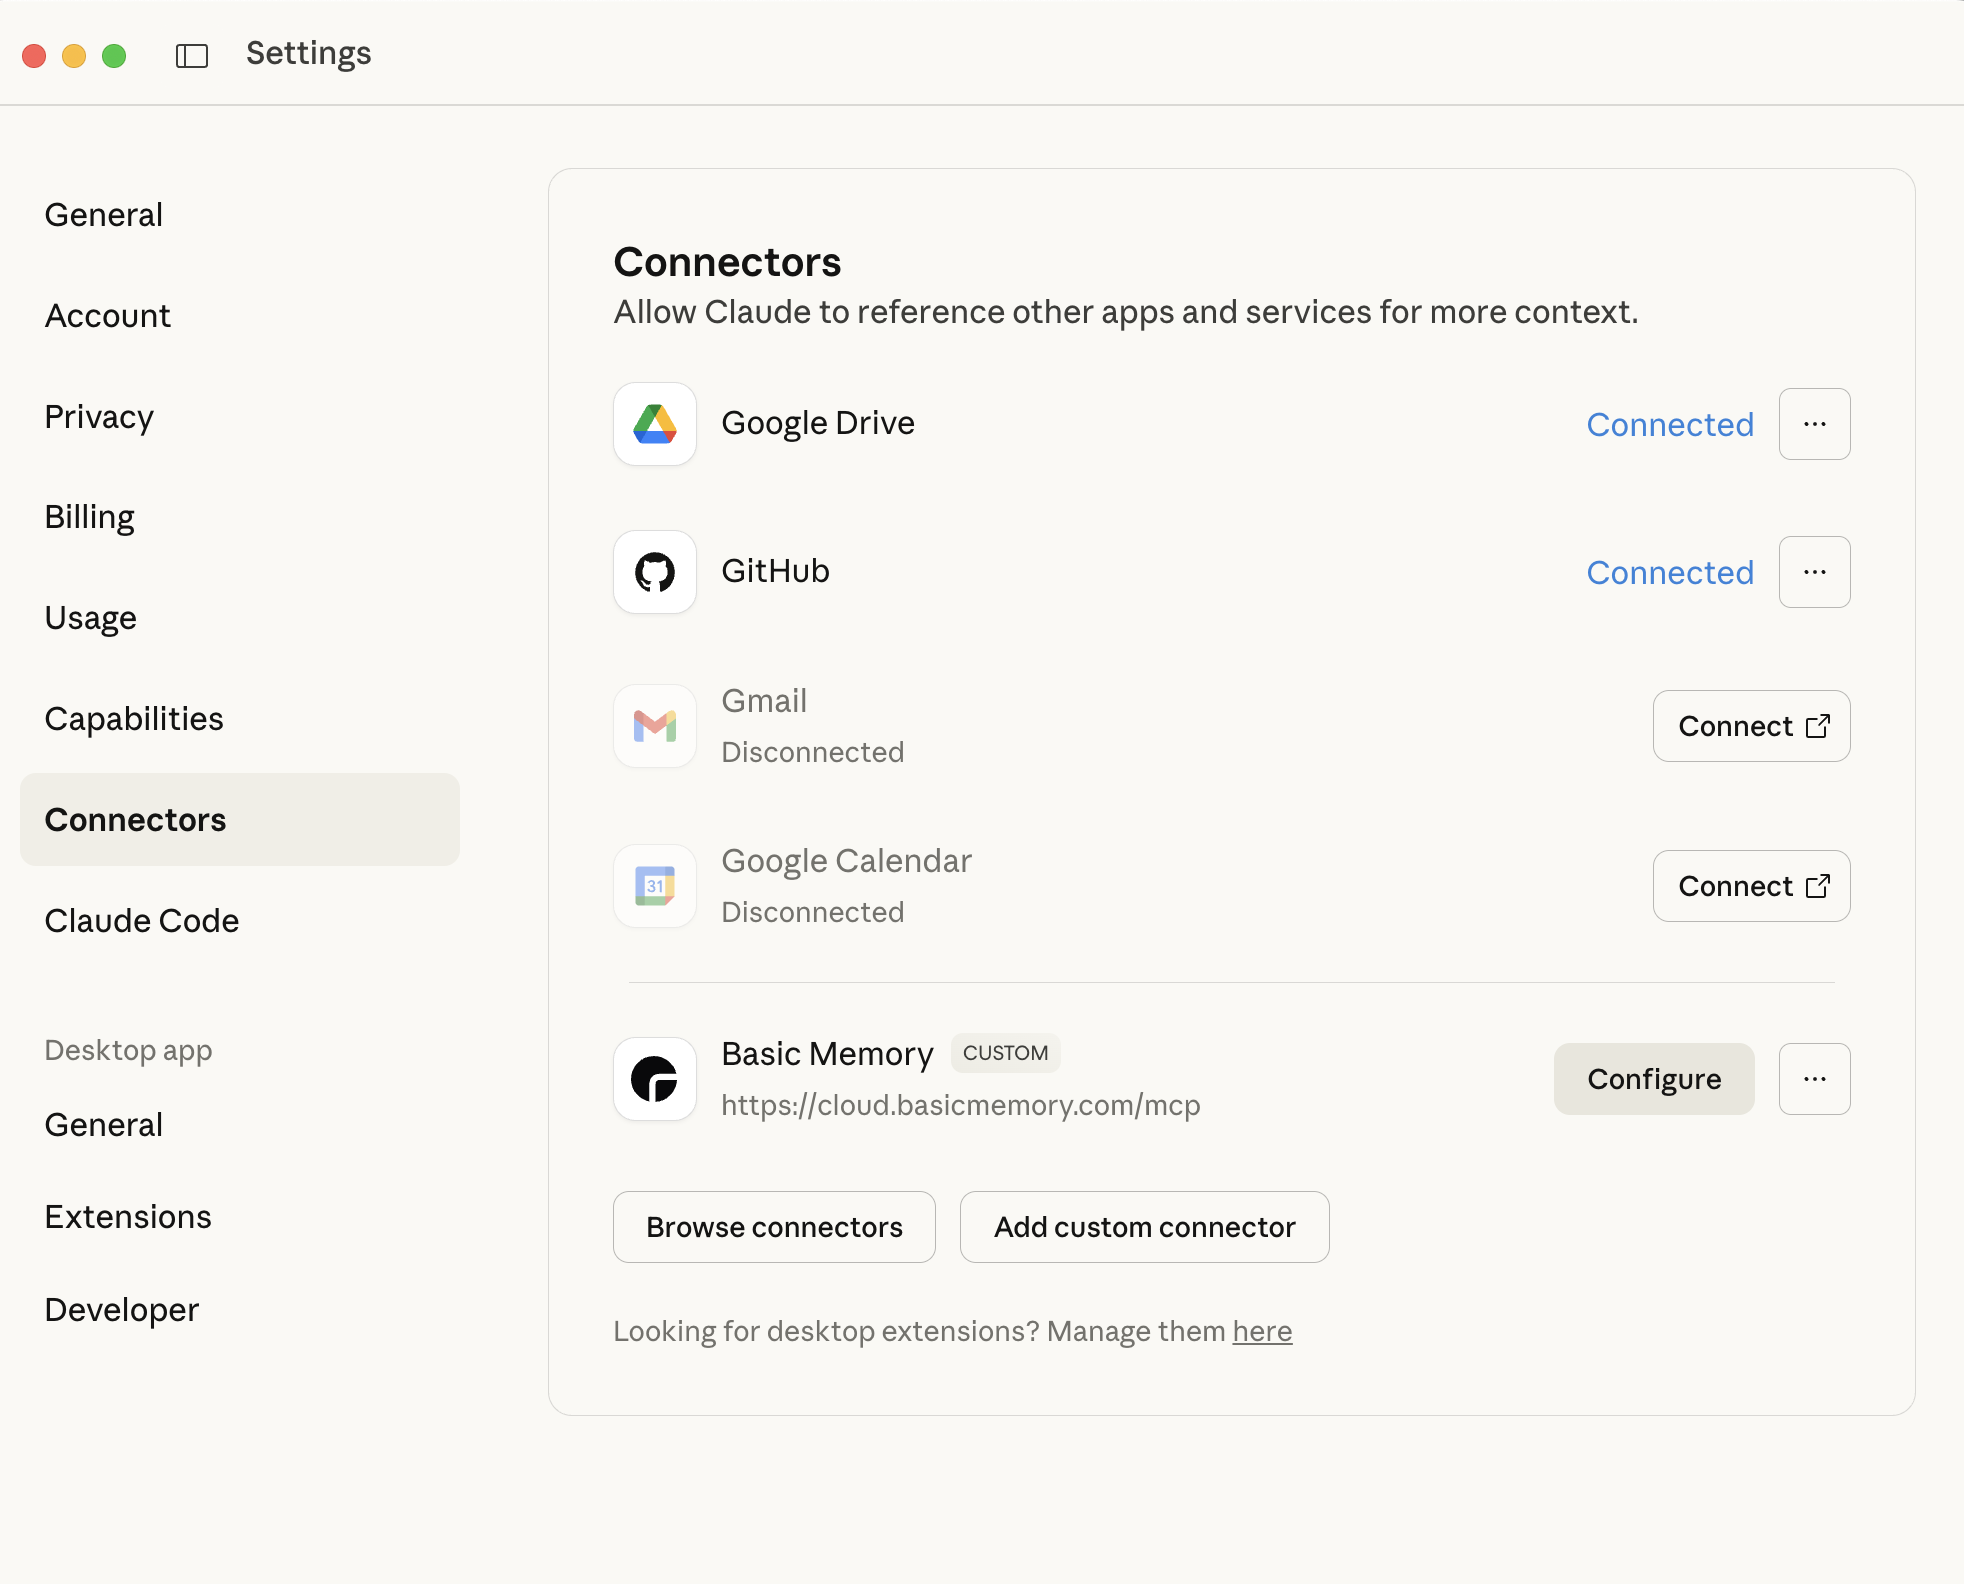
Verify Setup
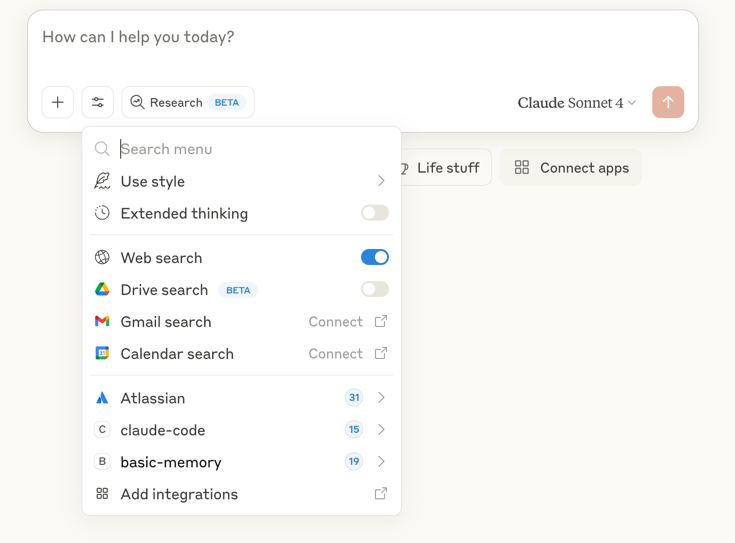
In Claude, click the tools icon (🔨) to see Basic Memory tools
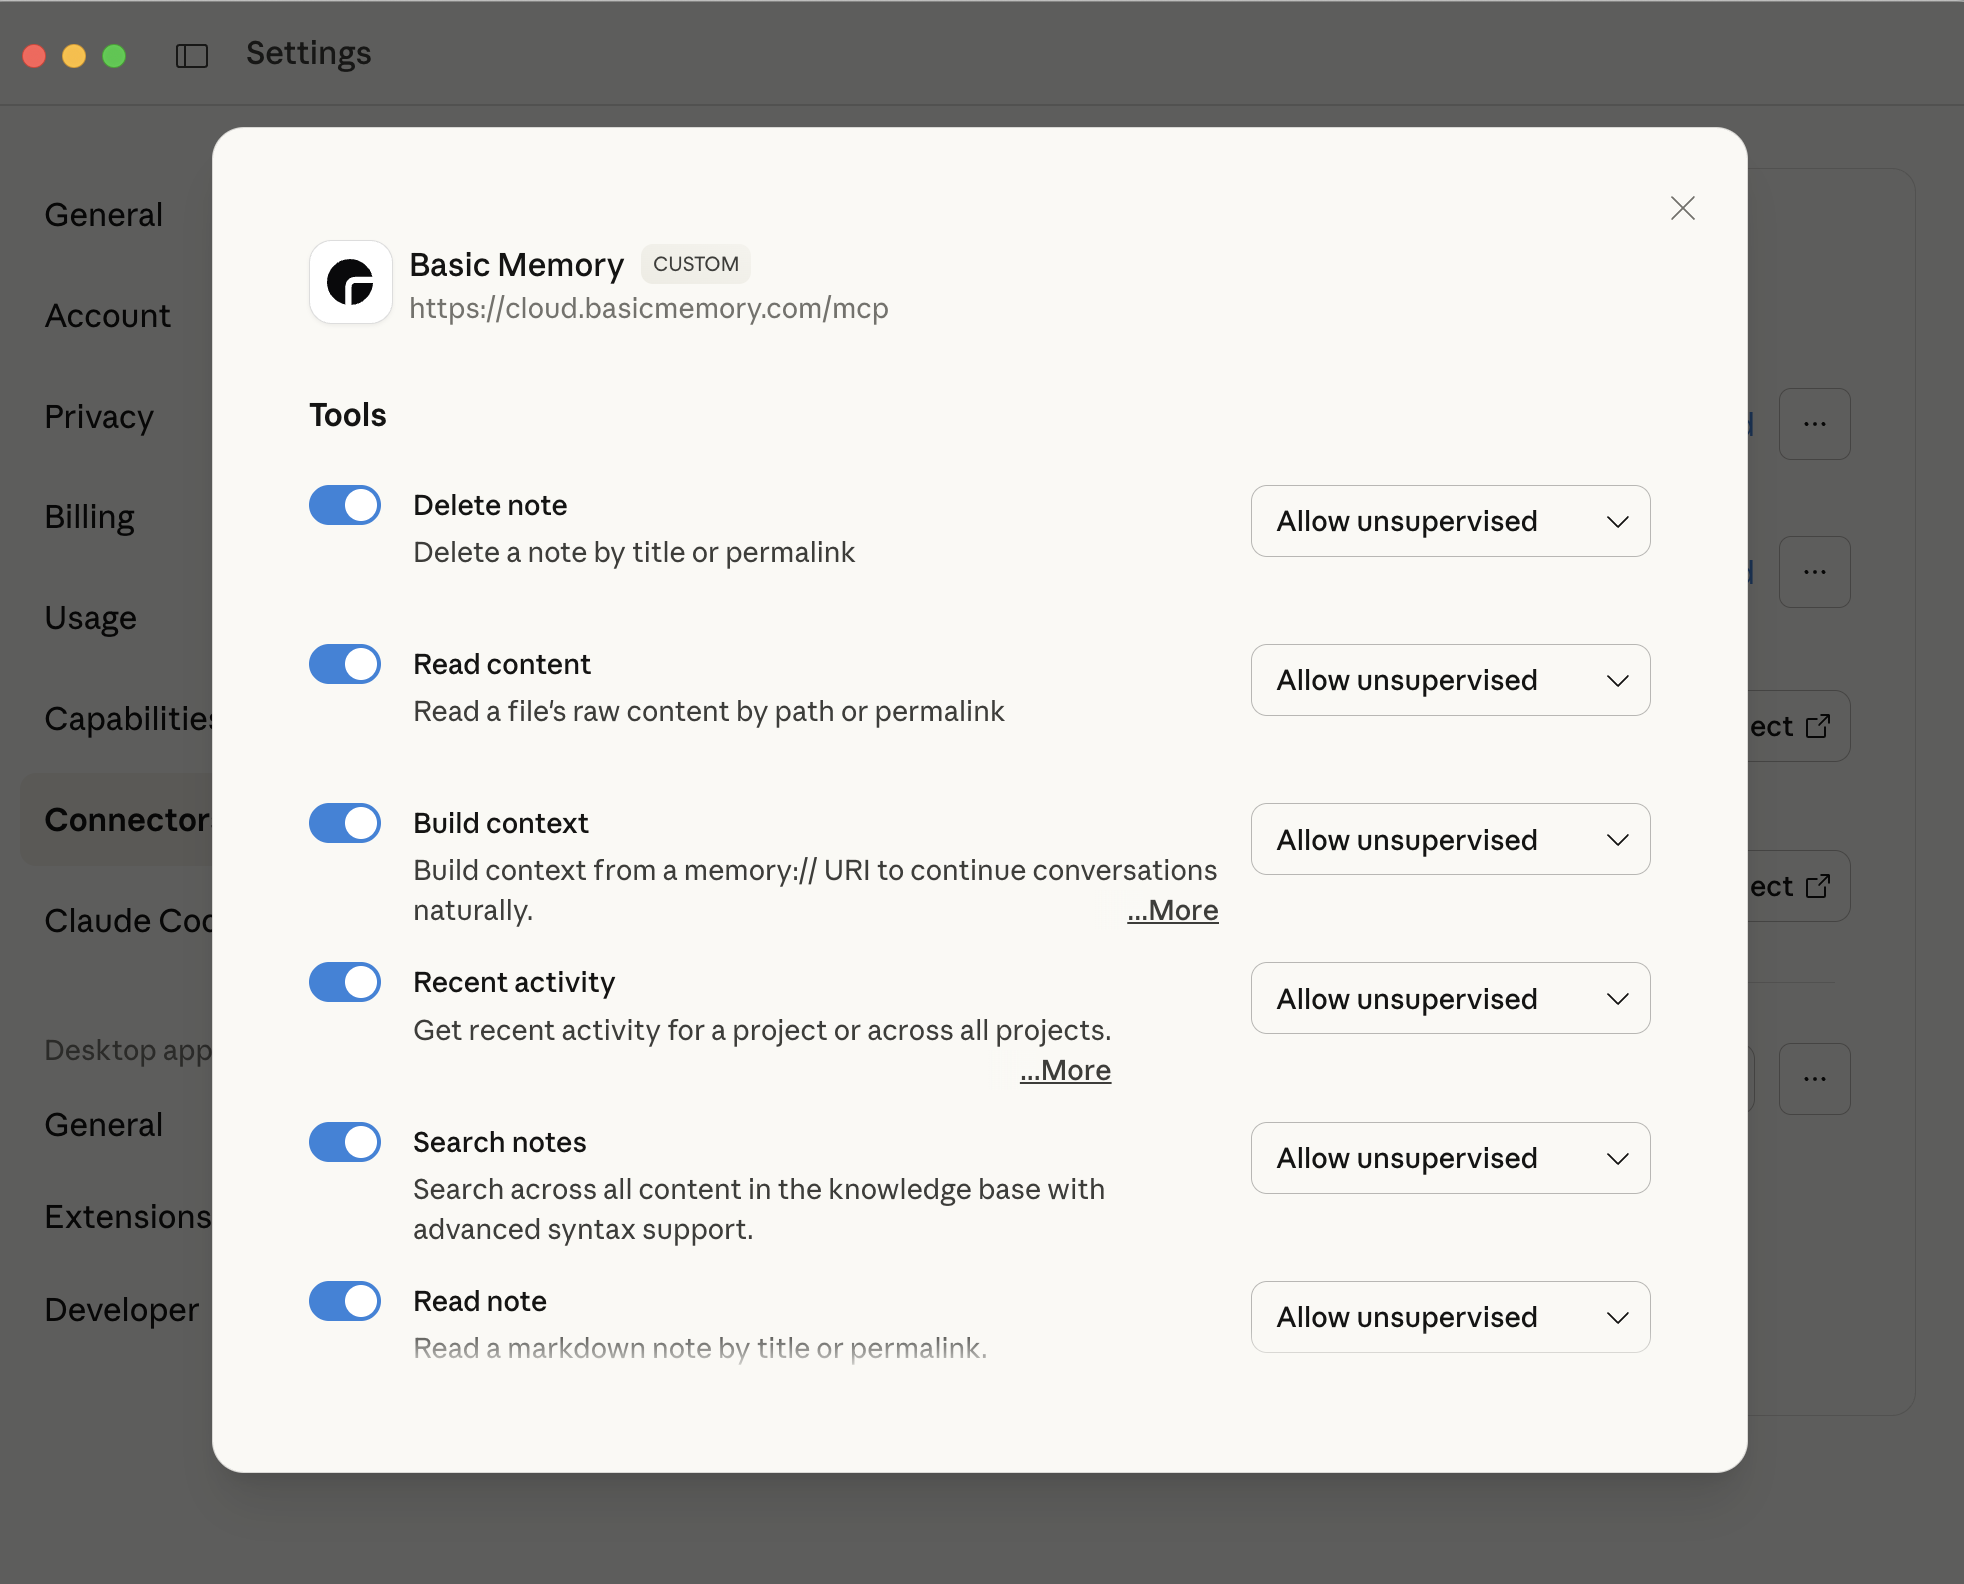
Try Prompting: List my projects
See the Cloud Setup Guide for detailed instructions, web editor usage, and troubleshooting.
Local Installation
Basic Memory is open source and free to install on your own machine using the stdio MCP transport. If you decide to use the cloud product later, you can easily upload or sync all of your notes and projects. See the Cloud Guide for migration options.
Single-Step Installation (Recommended)
The fastest way to get started with Basic Memory:
Paste this line into your terminal and press Enter:
curl -LsSf https://basicmemory.com/install/latest.sh | shThis single command will:
- Install UV package manager (if not already installed)
- Install Basic Memory via UV
- Configure Claude Desktop automatically with your permission
Universal Installation (All Platforms)
You can install Basic Memory using uv, an extremely fast Python package and project manager, written in Rust.
Requirements: Python 3.13 or higher
You can install uv from astral’s website ↗️. After installing uv you can install Basic Memory with the command:
uv tool install basic-memoryuvmust be installed and available in your system PATH. Claude Desktop runs in its own isolated environment and needsuvto manage dependencies.- Python 3.13+ required. Check your version with
python --version.
Homebrew Installation (macOS)
The easiest way to install Basic Memory on macOS is with Homebrew:
brew tap basicmachines-co/basic-memory
brew install basic-memory
If you use Homebrew, you do not need to install with uv or pip separately.
Configure Claude Desktop
Edit your Claude Desktop config, located at:
- macOS:
~/Library/Application Support/Claude/claude_desktop_config.json - Windows:
%APPDATA%\Claude\claude_desktop_config.json
{
  "mcpServers": {
    "basic-memory": {
      "command": "uvx",
      "args": [
        "basic-memory",
        "mcp"
      ]
    }
  }
}
Restart Claude Desktop. You should see Basic Memory tools available in the “tools” menu in Claude Desktop (the little hammer icon in the bottom-right corner of the chat interface). Click it to view available tools.
Choosing Where Your Notes Are Saved
By default, Basic Memory saves notes in a project called main in ~/basic-memory. If you want notes saved somewhere else—like an existing note-taking folder—you can change this easily.
Use Your Existing Notes Folder
The easiest way is to ask Claude directly in your conversation. For example:
Create a new project called "my project" in the "/Users/yourname/Documents/Notes" directoryThen:
Set the default project to "my project"Alternatively, you can use command line tools:
# Point Basic Memory to your existing notes folder
basic-memory project add "my project" <path to your project>

# Make it your default location
basic-memory project default "my project"
If you change default projects from the command line new notes will be saved in your chosen folder after restarting your MCP Client (e.g. Claude Desktop).
Want to use Obsidian? Just open your folder location as a vault. See the Obsidian Integration guide for detailed setup with existing vaults.
Need multiple note collections? You can create different projects for work, personal, etc. See Multi-Project Setup below.
Advanced configuration: Basic Memory stores its settings in ~/.basic-memory/config.json. While you can use CLI commands for most configuration (recommended), you can also edit this file directly to manage projects and settings. Changes to the config file require restarting Claude Desktop.
Multi-Project Setup
Basic Memory supports multiple projects for organizing different knowledge bases (work, personal, research, etc.).
How it works:
When you start a conversation, the AI will:
- Check your available projects
- Suggest the most active project based on recent activity
- Ask which project to use for this conversation
- Remember your choice throughout the session
Example:
You: "Let's work on documentation"

Claude: I see you have 3 projects: main, work-notes, personal
Your most active project is work-notes
Should I use work-notes for this task?

You: "Yes, let's use work-notes"
Creating projects:
# Command line
basic-memory project add "work-notes" ~/Documents/work

# Or ask Claude
You: "Create a new project called 'work-notes' in ~/Documents/work"
For users who primarily work in one project:
Enable Default Project Mode to automatically use your main project. Add this to ~/.basic-memory/config.json:
{
  "default_project": "main",
  "default_project_mode": true
}
With this enabled, the AI uses your default project automatically when no project is specified. You can still override this by explicitly specifying a different project when needed.
Creating Your First Knowledge Note
-
Open Claude Desktop and start a new conversation.
-
Have a natural conversation about any topic:
You: "Let's talk about coffee brewing methods I've been experimenting with." Claude: "I'd be happy to discuss coffee brewing methods..." You: "I've found that pour over gives more flavor clarity than French press..." -
Ask Claude to create a note:
You: "Could you create a note summarizing what we've discussed about coffee brewing?" -
Confirm note creation: Claude will confirm when the note has been created and where it is stored.
-
View the created file in your
~/basic-memorydirectory using any text editor or Obsidian. The file structure will look similar to:--- title: Coffee Brewing Methods permalink: coffee-brewing-methods tags: [coffee, brewing, equipment] # v0.14.0: Now searchable! --- # Coffee Brewing Methods ## Observations - [method] Pour over provides more clarity... - [technique] Water temperature at 205°F... ## Relations - relates_to [[Other Coffee Topics]]
Using Special Prompts
Basic Memory includes special prompts that help you start conversations with context from your knowledge base:
Continue Conversation
To resume a previous topic:
You: "Let's continue our conversation about coffee brewing."This prompt triggers Claude to:
- Search your knowledge base for relevant content about coffee brewing
- Build context from these documents
- Resume the conversation with full awareness of previous discussions
Recent Activity
To see what you’ve been working on:
You: "What have we been discussing recently?"This prompt causes Claude to:
- Retrieve documents modified in the recent past
- Summarize the topics and main points
- Offer to continue any of those discussions
Search
To find specific information:
You: "Find information about pour over coffee methods."Claude will:
- Search your knowledge base for relevant documents
- Summarize the key findings
- Offer to explore specific documents in more detail
See User Guide - Using Special Prompts for further information.
Using Your Knowledge Base
Referencing Knowledge
In future conversations, reference your existing knowledge:
You: "What water temperature did we decide was optimal for coffee brewing?"Or directly reference notes using memory:// URLs:
You: "Take a look at memory://coffee-brewing-methods and let's discuss how to improve my technique."Building On Previous Knowledge
Basic Memory enables continuous knowledge building:
- Reference previous discussions in new conversations
- Edit notes incrementally without rewriting entire documents
- Move and organize notes as your knowledge base grows
- Switch between projects instantly during conversations
- Search by tags to find related content quickly
- Create connections between related topics
- Follow relationships to build comprehensive context
Workflow Examples
Incremental Editing:
You: "Add a section about espresso to my coffee brewing notes"
Claude: [Uses edit_note to append new section]
File Organization:
You: "Move my old meeting notes to an archive folder"
Claude: [Uses move_note with database consistency]
Importing Existing Conversations
Import your existing AI conversations using the CLI commands:
# From Claude
basic-memory import claude conversations

# From ChatGPT
basic-memory import chatgpt
After importing, changes sync automatically in real-time. You can see project statistics by running basic-memory project info.
Quick Tips
General Usage
- Basic Memory syncs changes in real-time (no manual sync needed)
- Use special prompts (Continue Conversation, Recent Activity, Search) to start contextual discussions
- Build connections between notes for a richer knowledge graph
- Use direct
memory://URLs with permalinks for precise context - Review and edit AI-generated notes for accuracy
Next Steps
After getting started, explore these areas:
User Guide
Comprehensive usage instructions
Knowledge Format
Learn how knowledge is structured
Obsidian Integration
Visual knowledge navigation
Canvas Visualizations
Map concepts visually
CLI Reference
Command line tools
Staying Updated
To update Basic Memory when new versions are released:
# Update stable release
uv tool upgrade basic-memory

# Homebrew
brew upgrade basic-memory
After updating, restart Claude Desktop for changes to take effect.
Fluid project switching
Switch between projects during conversations
Advanced note editing
Edit notes incrementally without rewriting
Smart file management
Move and organize notes with database consistency
Enhanced search
Search with frontmatter tag support
Troubleshooting Installation
Fix Path to uv
If you get an error that says ENOENT , this most likely means Claude Desktop could not find your uv installation. Make sure that you have uv installed per the instructions above, then:
Step 1: Find the absolute path to uvx
Open Terminal and run:
which uvxThis will show you the full path (e.g., /Users/yourusername/.local/bin/uvx).
Step 2: Edit Claude Desktop Configuration
Edit the Claude Desktop config:
{
  "mcpServers": {
    "basic-memory": {
      "command": "/Users/yourusername/.local/bin/uvx",
      "args": [
        "basic-memory",
        "mcp"
      ]
    }
  }
}
Replace /Users/yourusername/.local/bin/uvx with the actual path you found in Step 1.
If you need to find your username you can type whoami in the terminal.
Step 3: Restart Claude Desktop
Close and reopen Claude Desktop for the changes to take effect.
Claude Says “No Basic Memory Tools Available”
If Claude cannot find Basic Memory tools:
- Check absolute paths: Ensure you’re using complete absolute paths to uvx in the Claude Desktop configuration
- Verify installation: Run
basic-memory --versionin Terminal to confirm Basic Memory is installed - Restart applications: Restart both Terminal and Claude Desktop after making configuration changes
- Check sync status: You can view the sync status by running
basic-memory status
Permission Issues
If you encounter permission errors:
- Check that Basic Memory has access to create files in your home directory
- Ensure Claude Desktop has permission to execute the uvx command